To avoid ruining your baked goods, start by mixing at low speed to prevent splattering and overmixing, which can make your treats tough. Always use the correct attachment, like the paddle, for efficient mixing. Add ingredients gradually to ensure even distribution and avoid overload, which strains your mixer. Don’t forget to scrape down the bowl often to incorporate everything perfectly. Mastering these basics will set you up for successful baking—keep going to learn more helpful tips.
Key Takeaways
- Begin mixing at low speed and gradually increase to prevent splattering and overmixing.
- Use the correct attachment, like the paddle, and ensure it is securely attached before starting.
- Mix only until ingredients are just combined to avoid developing tough gluten and dense textures.
- Add liquids and dry ingredients gradually to ensure even distribution and reduce strain on the motor.
- Regularly scrape down the sides of the bowl to incorporate all ingredients and prevent unmixed pockets.
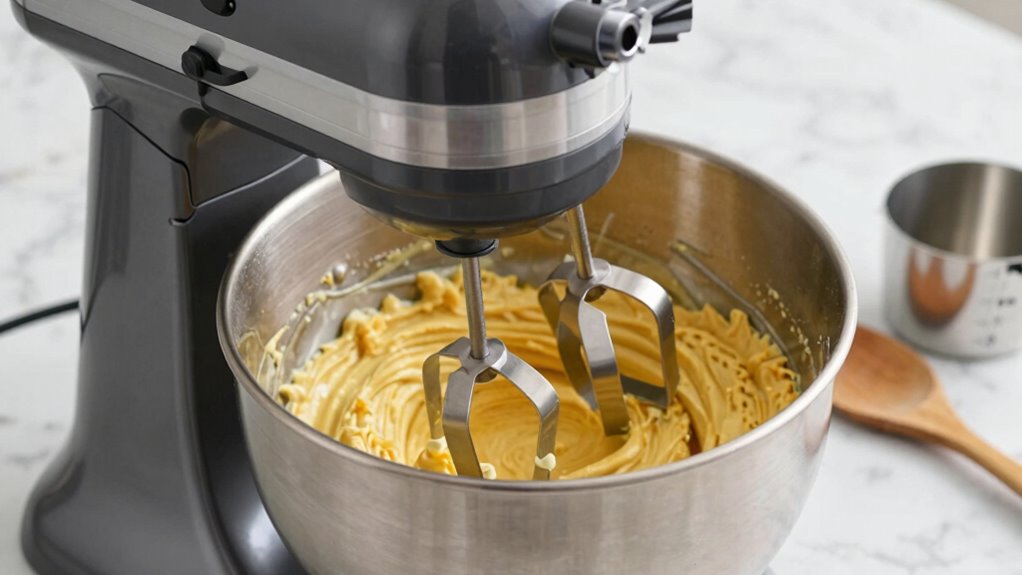
Getting started with a stand mixer can be exciting, but beginners often make simple mistakes that can affect their results. One common error is overmixing batter, which can lead to tough baked goods or a dense texture. When you overmix, you’re developing too much gluten in the flour, especially in recipes like muffins or quick breads. To avoid this, pay close attention to your mixing time. Once your ingredients are just combined and the batter looks smooth, stop the mixer. It’s tempting to let it run longer, but doing so can ruin the final product.
Avoid overmixing your batter to keep baked goods tender and fluffy.
Another mistake beginners often make is neglecting the paddle attachment. The paddle is designed to efficiently mix ingredients without overworking the batter. If you forget to attach it or use the wrong attachment, your mixture won’t incorporate properly, and you might end up with uneven textures or clumps. Always double-check that the paddle is securely attached before starting your mixer, and use it for most mixing tasks like creaming butter and sugar or mixing dough. Using the appropriate attachment not only ensures better results but also prolongs the life of your mixer.
It’s also important to start your mixer on a low speed. Jumping straight to high speeds can cause splattering or incorporate too much air into your batter. Begin mixing at the lowest setting until ingredients are combined, then gradually increase the speed if needed. This approach gives you more control and prevents messes or overmixing.
Be mindful of ingredient placement as well. Add ingredients gradually, especially liquids and dry components, to prevent splashing and ensure even mixing. If you dump everything in at once, you risk uneven distribution or overloading the motor. Take your time, add ingredients in stages, and keep an eye on the consistency of your batter.
Additionally, it’s helpful to know your mixer’s capacity and avoid overloading it, which can strain the motor and lead to damage.
Lastly, don’t forget to scrape down the sides of the bowl periodically. Ingredients tend to stick to the sides, especially during longer mixing sessions. Scraping ensures everything gets incorporated evenly and prevents pockets of unmixed flour or butter from ruining your final product.

Flex Edge Beater for KitchenAid,Mixer Attachement Compatible With KitchenAid,Mixer Accessory,Fits Tilt-Head Stand Mixer Bowls For 4.5-5 Quart Bowls,Beater With Silicone Edges,Grey
MATERAL:Made Of Die-Cast Aluminum With White Ford Teflon Coating And Silicone Flex Edge,Which Is Safer And Healthier Than…
As an affiliate, we earn on qualifying purchases.
As an affiliate, we earn on qualifying purchases.
Frequently Asked Questions
Can I Use a Stand Mixer for Heating or Cooking Ingredients?
You can’t use a stand mixer for heating or cooking ingredients because its primary purpose is mixing, not cooking. While some mixers have limited heating capabilities for specific tasks like melting chocolate or warming ingredients, they aren’t designed for full-scale cooking. Rely on proper appliances like stovetops or slow cookers for heating or cooking. Relying on your stand mixer for heating could damage the motor or ruin your food.
How Do I Clean the Mixer’s Attachments Properly?
Did you know that proper attachment care can extend your mixer’s lifespan by up to 30%? To clean attachments effectively, remove them after each use and wash with warm, soapy water. Use gentle cleaning techniques, like a soft brush for stubborn residue, and avoid abrasive cleaners. Dry thoroughly before reattaching to prevent rust. Regular cleaning keeps your mixer working smoothly and guarantees your food stays safe and delicious.
What’s the Best Way to Store My Stand Mixer?
To store your stand mixer, follow these storage tips for ideal countertop placement. Keep it in a dry, clutter-free area away from direct sunlight and moisture. If space is tight, consider storing it in a cabinet or pantry to prevent dust buildup. Always clean the attachments and wipe down the mixer before storage. This way, your mixer stays in good condition and is ready for your next baking session.
Are There Specific Speed Settings for Different Recipes?
Think of your stand mixer as a master chef’s toolkit—using the right speed settings is key. For delicate recipes like meringues, start slow and increase gradually; for thicker doughs, go higher. Adjust speed settings based on your recipe’s needs, and don’t be afraid to experiment. Proper speed control guarantees your food turns out perfect, giving you consistent results every time.
How Do I Troubleshoot if the Mixer Isn’T Turning On?
If your mixer isn’t turning on, first check the power outlet to verify it’s working—try plugging in another device. Then, inspect the safety switch; make sure it’s fully engaged, as most mixers won’t operate if it’s not. Also, examine the power cord for damage. If these steps don’t work, reset the safety switch if your model has one or consult the user manual for further troubleshooting.
Flex Edge Beater for KitchenAid,Mixer Attachement Compatible With KitchenAid,Mixer Accessory,Fits Tilt-Head Stand Mixer Bowls For 4.5-5 Quart Bowls,Beater With Silicone Edges,Grey
MATERAL:Made Of Die-Cast Aluminum With White Ford Teflon Coating And Silicone Flex Edge,Which Is Safer And Healthier Than…
As an affiliate, we earn on qualifying purchases.
As an affiliate, we earn on qualifying purchases.
Conclusion
Avoid these beginner mistakes, and you’ll become a stand mixer pro in no time. Mess up, and you risk turning your kitchen into a disaster zone where batter flies everywhere and your once-perfect cake is ruined forever. But follow these tips, and you’ll be whipping up bakery-quality treats without a single mishap. So, don’t let rookie errors turn your delicious dreams into soggy, overmixed nightmares. Master your mixer, and impress everyone with your baking prowess!

KCKHFA Stainless Steel Mixer Bowl Fit for KitchenAid Artisan&Classic Series 4.5-5 QT Tilt-Head Stand Mixer, Mixing Bowl with Comfortable Handle
Perfect Compatibility with KitchenAid 4.5–5 QT Mixers: Specially designed to fit KitchenAid Artisan and Classic Series tilt-head stand…
As an affiliate, we earn on qualifying purchases.
As an affiliate, we earn on qualifying purchases.

Whisk Wiper® PRO for Stand Mixers – Mix Without The Mess – The Ultimate Stand Mixer Accessory – Compatible With KitchenAid Stand Mixers (For Tilt-Head Mixers, Classic Blue)
ONLY FOR KITCHENAID TILT HEAD MIXERS: wipe your stand mixer whisk and bowl in seconds
As an affiliate, we earn on qualifying purchases.
As an affiliate, we earn on qualifying purchases.